We have a simple question. Can a GoPro camera be used to optically track satellites in the night sky? So this text will give you our findings. We will go into details for you to replicate the settings and we are very interested in your opinions and results. So please visit our Zulip chat let’s discuss.
This text is intended to be part of a multi step tutorials how to track satellites. So please check again in the future for further updates.
Starting questions?
As with every project, we have open questions where we want to find answers to:
- What is needed for orbit determination?
- How is this impacting the camera settings for good nightviews of faint stars and objects?
When optical observations are used, orbit determination is done via angles between the object in the sky and the direction towards north (azimuth angle) as well as the angle above horizon (elevation angle). These are obtained for the satellite movement for each timestamp during its pass over the sky.
Depending on the following method of calculating the orbit parameters, at least 3 separate measurements must be taken.
This leads to the observer being able to optically „see“ the satellite during its pass. So we set the GoPro Hero 8 to the following settings:
- Lens: linear (4k – 4.3)
- Shutter: auto
- Format: night lapse (photo)
- Trigger duration: 10 seconds
- ISO: 400 / 400 (min/max)
- White balance: 5500 K
- Colour: GoPro
- Mounting: on fixed stative
- File: JPG
The following video was taken with these settings during a moon-less sky and no clouds. Only Venus was bright. The results were okay for the SpaceX Starlink satellites.
The settings could be a bit brighter, so either the trigger duration could be longer or the ISO could be higher. But that depends on what you want to achieve. With higher ISO, you get more sensor noise. And with an ISO range, that the camera automatically decides to use wrt. to the lighting condition, the results can vary by each photo.
With longer trigger durations, you maybe do not get enough measuring points (remember the measurements needed for orbit determination).
Our next measurements will be with an ISO range of 400 to 800 and saving JPGs and RAWs (in GPR format). We will post the results here when it’s done.
Derived Questions
By this simple test, we now know it is possible (if th weather is still on our side :D). So now we can spend some energy in thinking about the next questions that deal about „how can we use photos of satellite positions to make positions on a satellite orbit?“
- How can the orientation of the camera be determined?
- How can the exact time of each photo be determined?
- How can the location of the camera be determined?
- Which satellites to try out everything and to re-iterate the findings?
How can the orientation of the camera be determined?
In our setting, the camera is fixed mounted, so we only need to determine the orientation once (and only check for unintended movement, by wind, people, birds, …). The orientation of the camera is with respect to the horizon and we need the azimuth angle, the elevation angle (and the roll angle). By this, we know to where the camera is pointing at any given time.
You can do this by a compass for the azimuth angle, and with some more creativity with the local vertical direction for the elevation and the roll angles. But even then the task is not finished, because we will need this for each pixel on the sensor and not just the center pixel. And this is also imprecise.
What we will use here is astrometry. Astrometry is the precise measurements of the positions and movements of stars. The information obtained by astrometric measurements provides information on where each star is located to a given point in time.
So we will exploit two effects here.
Firstly, we will use the known positions of stars that we have captured on our photo and derive celestial positions (in this case they are called Right Ascencion, Dclination and Roll) and transform them to Azimuth and Elevation (and Roll). This will map each pixel on the photo with their specific angles.
And secondly, we will use the fact that our interested targets are satellites that move faster than the background stars so we can detect them with our own eyes (and thus it will be possible to detect them with alorithms, later).
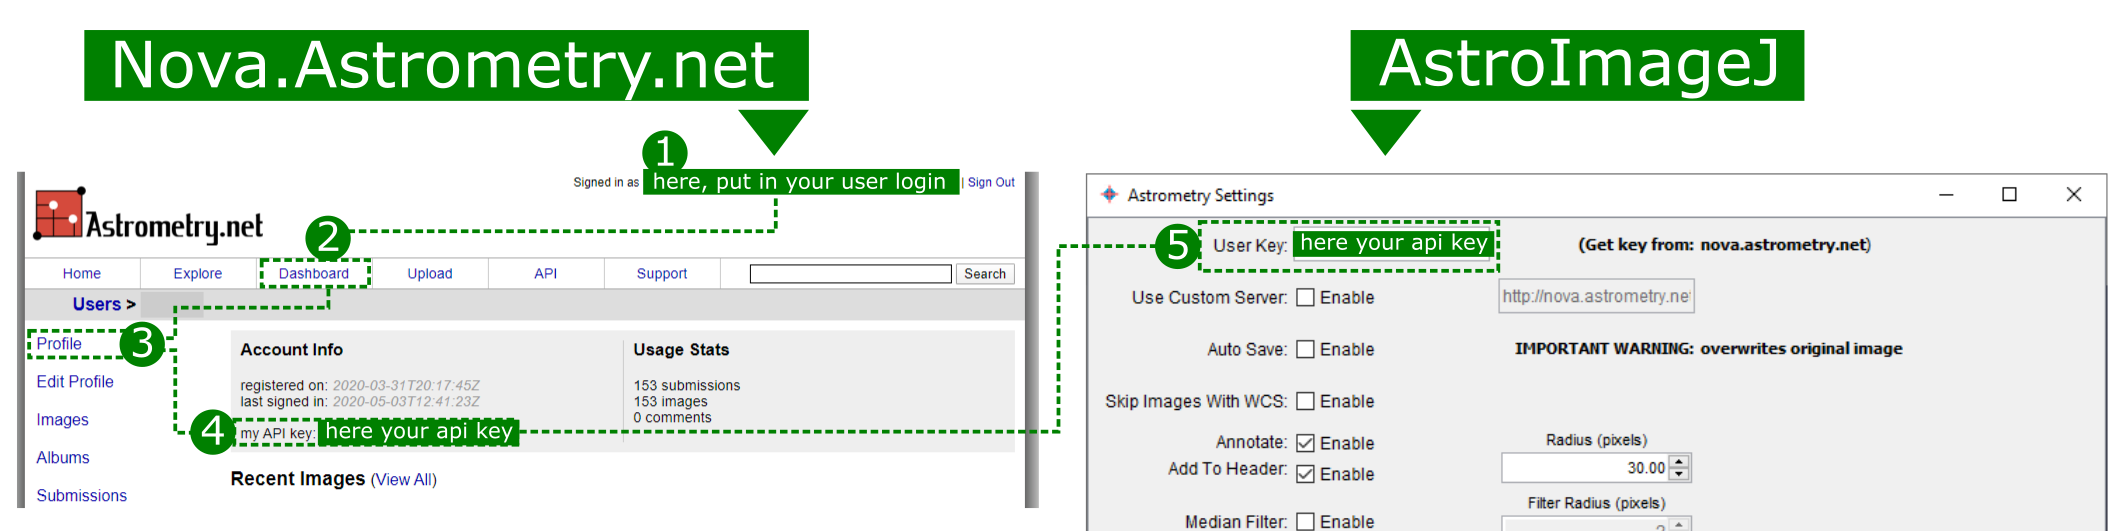
There is a great open-source community of astrometry scientists and hobbyists working on the awesome Nova.Astrometry.net. You can do a lot with this software, but for the scope of this mini tutorial, we will concentrate on the API interface that allows us to upload an image to their server and with some luck, it will send back a result file with the needed orientation per pixel.
What we need to do now is:
- create an account on nova.astrometry.net and get our personal API token
- download the AstroImageJ programme, that we will use to prepare our images, to submit them to nova.astrometry.net and also for working with the result-files later on.
- select some promising photos for procssing and being patient (sometimes, not the first try works to get a good result)
Helping you a bit with setting this up, go to nova.astrometry.net and to „Dashboard > my profile > in the Account Info field„. There you see a cryptic letter seqeuence in „my API key„. This is your API key and you put it into the AstroImageJ tab „WCS > Plate solve using Astrometry.net (with options)…„. Now you can use their free service for analysing your photos. Please be so kind and not overuse it.
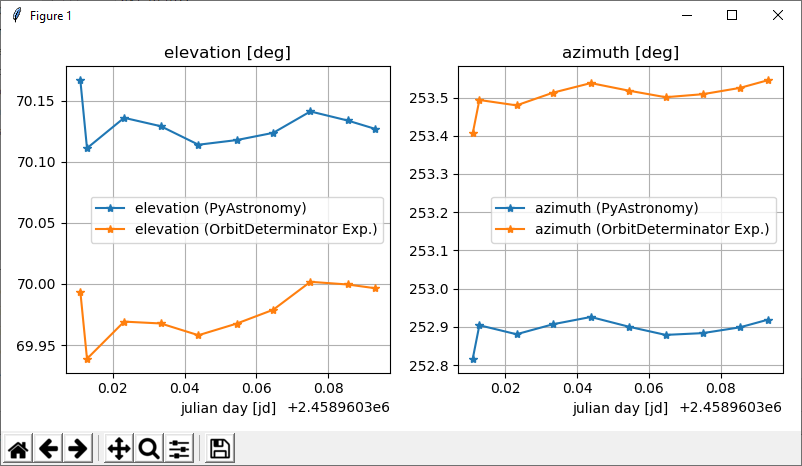
We did two logic tests with the results from astrometry.net. Firstly, the Venus was visible during our tests, so we cross-checked the visible and relatively moving position with the delivered righ ascencion and declination (RA-DEC) and the Azimuth and Elevation (Az-El) with SkyView lite app. And secondly, we checked the static orientation of the camera itself in Az-El angles. We did so by using the center pixel and the resulting RA-DEC coordinates of several photos to get the Az-El angles. This is done by taking the RA-DEC and the time of the photo, determine the sidereal time and perform a coordinate transformation from the geocentric equatorial RA-DEC system, to the topocentric equaltorial RA-DEC system, and then into the topocentric Az-El system.
The expactation is, that the RA-DEC position values of the center pixel will change with each time, because the Earth rotates and the fixed camera will always point to another RA-DEC coordinate. By using the sidereal time, this corrects the change due to rotation and so the Azimuth and the Elevation are also fixed (with some precision). During the 2 hours of timelapse photos, we took 15 photos and the Az-El position is rather steady as expected. The small variation could be due to wind shaking the stativ a bit, or more likely, the photo time is a bit off and thus the sidereal time. But in general, the long term stability should be possible. This rlative stability was observed, as you can see in the graphs below.
How can the exact time of each photo be determined?
The GoPro is a neat little camera. We selected it not only because it is a good action cam and has a bit community, but also it comes with some nice little features inside pre-installed. In this case, the included GPS system takes care of the precise timing. We can just extract the date and time from the EXIF metadata from the photo files themselves. So we do not need to bother to set it up, GoPro takes care of this.
However we have to take care of the integration time. Because we set a trigger duration of 10 seconds, we need to know when the timestamp is acquired. We did not find any GoPro data sheets, so we just did the second best; we just started a 30 seconds photo at the full minute and then checked the EXIF data. The timestamp is acquired at the end when the photo file is stored on the SD-card.
This information obtained before, we really need to know for the satellites that were captured on photo. The 10 seconds exposure time will result in the bright satellite as lines on a single photo. And with any single photo, without further knowledge you do not know which side of the streak-line will be the start or the end. So you cannot set the start time and end time to the respecting times. So when you know the sequence of the same satellite „streak“, you can then set the start and end time to the line. So as seen in the animated gif below for example, the line point 14 was was captured in the same image as with line point 13. Line point 14 is the last „light“ that was captured of the bright satellite so the time stamp of the image is representing this line’s side. 10 seconds before, when the camera started to collect light for the photo, the satellite’s bright light started to draw the line on the sensor, thus this side is earlier by the exposure time of 10 seconds.

In the end, if you do this with all photos in the sequence, you will have 24 single measurements of one satellite that you can use for orbit determination.
This is easy, but wait for photos when there are several Starlink satellites inside. And we want to have several satellites in one frame for later algorithm work. 🙂
How can the location of the camera be determined?
So for Orbit Determination, we have the 2 angles azimuth and elevation for each pixel of a photo, we have the time of each photo, and now only the location where all angles initiate are missing. But this is also easy. As mantioned before, the camera is fixed in the location. So either we just take the GPS date from the EXIF again, or we take it from OpenStreeMap.org or any other service you like.
Which satellites to try out everything and to re-iterate the findings?
Now we have all technical things prepared. But before we go outside and maybe freeze our butts off and do not see any satellite passing by, or they are passing by but they are just outside the camera’s field of view, we should check for goot observation times.
There are webpages like Heavens-Above.com allowing you to select for satellites and your location, and then telling you the passover times and the magnitudes, when they typically reflect or flare. Me personally, I like GPRECIT because I can also take it with me on a laptop and do not need an Internet connection. It just needs an up-to-date orbit-prarameter file (TLE, for example from Celestrek.com).
By this, you can narrow down and the viewing-directions you can capture satellites. And if you do not mind and have enough time and patience, you can also just continously monitor the night-sky. And if you are like us, you can also try to find an algorithm that automatically detect possible satellites in the photos. This is for another text.
Conclusions
So, a GoPro Hero 8 works for optical satellite obersvations. Maybe it is not the best camera (because it is not an infrared camera or else), but many people have them and it has included features we will need for orbit determination.
The GoPro photos are good enough for Astrophotos and Astrometry. So this reduces the efforts to use another Inertial Measuremen Unit (IMU) and avoids furter thoughts of how to calibrate each pixel of the sensor to the fixed Body Reference Frames (BRF) that will define the azimuth and elevation of each pixel that we need.
To-dos for next steps
- test the Orbit Determination with the derived Az-El, time, location data we obtained in this tutorial.
- improve the GoPro settings to make it easier for Astronomy.net to process it. We still have to many failed attempts
- code the algorithm to calibrate the pixels to their fixed Az-El representations by the RA-DECs of only a few photos and not every photo.
If you already have done all or parts of this, feel invited to chat with us about it in our Zulip chat and we will be happy to include it here.
Update 2021-05-29
http://nova.astrometry.net/status/3459127
http://nova.astrometry.net/status/3459098
http://nova.astrometry.net/user_images/3665232
http://nova.astrometry.net/user_images/3664639
http://nova.astrometry.net/user_images/3664617
http://nova.astrometry.net/user_images/3664594
http://nova.astrometry.net/user_images/3664580
http://nova.astrometry.net/user_images/3663350
http://nova.astrometry.net/user_images/3664562
http://nova.astrometry.net/user_images/3665423
http://nova.astrometry.net/user_images/3599955#annotated
http://nova.astrometry.net/user_images/3599905#annotated
http://nova.astrometry.net/status/3457499
http://nova.astrometry.net/user_images/3599901#annotated
http://nova.astrometry.net/user_images/3599189#annotated
http://nova.astrometry.net/user_images/3599142#annotated
http://nova.astrometry.net/user_images/3599081#annotated
http://nova.astrometry.net/user_images/3599893#annotated